Monthly Archives: March 2025

The Praying Mantis in Your Garden

This insect can be large and intimidating, but the praying mantis in your garden is a guest to welcome and celebrate, not one to fear or eliminate. Understanding these beneficial insects can help every gardener realize just how useful praying mantids can be.

About the Praying Mantis;

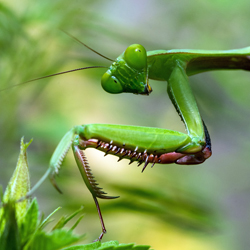
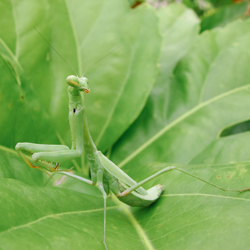
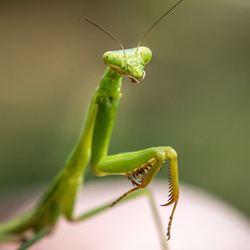
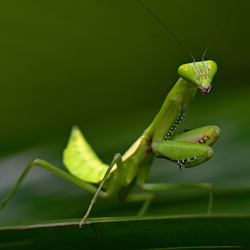
There are more than 2,400 species of praying mantis in the world, and they are found in all types of temperate and tropical climates. These large insects range from 2-5 inches in length, and have long, tapered bodies, triangular heads, bulging compound eyes, long jointed forelegs, and semi-upright posture. Their colors range from different shades of green to brown and tan, which serves as excellent camouflage to protect them in their foliage habitats.

Praying mantids have been found as fossils as old as 135 million years, and they’ve evolved to be very efficient insect predators. The average praying mantis lives for just a few months or up to a year, depending on the climate, and females generally lay their eggs in the fall. The egg cases are dormant through the winter, but will hatch in spring so a new generation of praying mantids can be part of the garden.

What a Praying Mantis Eats

These are carnivorous insects that eat a wide range of other insects. Praying mantids are ambush predators, lying in wait and watching carefully for a succulent bite to come within reach of their fast, powerful forelegs. When suitable prey approaches, they will quickly strike, spearing their meal with their sharp, jagged legs.

As generalist predators, praying mantids will eat just about anything they can catch, including aphids, leafhoppers, mosquitos, crickets, grasshoppers, beetles, caterpillars, and flies. Because mantids will hunt at night as well as during they day, they often prey on moths as well. Larger varieties of mantids may also even hunt small lizards, frogs, salamanders, and even hummingbirds.

Gardeners must remember, however, that praying mantids are generalists and do not discriminate about the prey they catch. While they will eat a wide range of insects that can be harmful in the garden, they are just as likely to eat more helpful visitors, including bees, ladybugs, and butterflies. Despite their hearty appetites, however, praying mantids are part of nature’s ecological balance and can be valuable to have in the garden.

Attracting Praying Mantids to Your Garden

A praying mantis can be a very helpful insect in the garden as it eats a wide range of other insects, helping keep different bug populations in check. Attracting mantids is not difficult, but they do require sufficient shrubby foliage for shelter and adequate hunting grounds. Rose and raspberry plants are especially attractive to mantids, and tall grasses are also good praying mantis plants. Foliage should be kept intact rather than severely pruned, and chemical use ought to be minimized, particularly in fall when the females are laying their egg cases, which are more sensitive to pesticides. Organic gardens are the best options and most welcoming landscapes for mantids.

If your garden is not naturally home to praying mantids, you can easily introduce these large insects into your garden’s ecosystem. Egg cases are available for purchase that can yield up to 200-300 young mantids each when they hatch, though of course the mortality of young mantids is quite high. Egg cases can be purchased online or from garden centers and nurseries that offer different beneficial insects. When you receive egg cases, position them in sheltered crooks and crotches of trees and shrubs, ideally in warmer locations with filtered sunlight. The cases will hatch after 10-15 days of warm weather, and the young mantids can disperse throughout the landscape within an hour of hatching.

As you work in your garden throughout the summer, you may occasionally come across a mature praying mantis lying in wait for its next meal. These insects pose no harm to humans, and only rarely bite if stressed and threatened. The best action is to leave the insect as it is, or if it must be moved, gently relocate it to a patch of foliage in a quiet area. Ideally, relocate mantids away from butterfly host plants or active bee colonies to minimize their impact on other beneficial insects.

A praying mantis is a great guest to see in your garden, and their voracious appetites can help provide natural pest control to keep less welcome insects at bay. By understanding these large, carnivorous bugs better, it is easy to provide exactly what they need in your garden and ensure they can fill their own ecological role admirably.

Praying Mantis
Praying Mantis
Praying Mantis
Praying Mantis

Scented Geraniums

Unmatched for fragrance and beauty in the garden, scented geraniums are undoubtedly showstoppers. With many to choose from, each with its own distinctive habit and fragrance, scented geraniums are also great for hanging baskets, window boxes or any type of container. Although the colorful flowers are small, the leaves of the scented geranium are the most spectacular part of this unusual herb.

A Bouquet of Scents

Scented geraniums come in a wide range of distinctive aromas. Some of the most popular varieties include…

  • Rose Geranium: This cultivar has spicy rose-scented foliage with small clusters of pink flowers among the dark green leaves.
  • Peppermint Geranium: This is a fast growing geranium that spreads to a 4-6 foot mound with clusters of white flowers appearing in summer. Leaves are lobed and medium green. This is a particularly good one for hanging baskets.
  • Lime Geranium: This geranium shows off beautiful lavender flowers in summer and its leaves are serrated, round and light green. These can become quite bushy.
  • Apple Geranium: Apple-scented geranium is another good one for a hanging basket. Clusters of white flowers appear on trailing stems and leaves are round and ruffled.
  • Lemon Geranium: This geranium has tiny purplish flowers and small wrinkled leaves. This one features a nice clean lemon scent that freshens a room quickly.
  • Coconut Geranium: This plant has a trailing habit that works nicely as a ground cover or in a hanging basket. Its flowers are in small clusters and its leaves are round and dark green.

Other popular scented geraniums include chocolate, nutmeg, orange, apricot and almond.

Growing Tips

Scented geraniums are not particular about soil, as long as it is drained – they do not tolerate wet roots well. These plants enjoy full sun and cool climates, with partial shade in warm areas. Pinching off end leaves will encourage bushiness to help keep a fuller, more compact form.

The leaves can be harvested any time and used fresh or dried.

Harvesting and Use

One of the real joys of scented geraniums is harvesting the leaves and using their fragrance in a variety of ways. The leaves can be harvested at any time, and they may be used fresh or dried, though the fragrance may change somewhat or its potency may change as it is dried. Experiment with both fresh and dried leaves to find the aromas you like best.

Scented geraniums can be used in some jellies, puddings, stuffing, punches, teas and vinegars. The oils in leaves are often distilled to make perfume, and the leaves make a sweet addition to sachets and potpourris. No matter how you use them, or even if you simply enjoy them in the garden, these lovely plants are sure to be a welcome addition to your garden and landscaping.

Scented Geranium

Nothing Says Welcome Like an Entry Garden

Now is the time to start planning your entry garden. This welcoming patch has the power to set a warm and friendly tone for those who pass through your garden on the way to your front door. It does take some planning to set the proper mood, however, and you need to consider architecture, setting, scale, boundaries and maintenance.

Architecture and Setting

First, it is critical that your garden style suits your architecture and setting to create a cohesive, uniform look. Try to match the hardscaping and plants to the style and feel of your house. A cottage or farmhouse would be accentuated by a friendly, loose informal garden with plants spilling onto the walkway and colors blending together at the edges of beds. A more formal and symmetrical building, however, should be paired with a more structured garden that includes well-groomed shrubbery, stately flowers and a well-defined path.

Plant Scale

Pay attention to the scale of the plants you choose. Plants that will grow too tall or broad can overwhelm the house or crowd the walkway. Plants that are too small can make the house feel too large and unwelcoming. Investigate the mature sizes of plants and be sure they are positioned appropriately within your entry garden so they will not crowd one another or block key features of your home, such as house numbers or security lighting.

Garden Boundaries

Consider setting boundaries for the garden using a fence, wall, hedge or gate. The boundary could encompass just the area around the front door, might include a flowerbed border or could frame the whole yard, but keep in mind the size and style of your home. A white picket fence around the entire yard is a quaint option for a cottage-esque home, but would look out of place with an elegant brick manor, which would be more suited to a wrought iron boundary or classic boxwood hedges.

Maintaining Your Entry Garden

Be realistic about the amount of time you have to maintain your entry garden. If you have limited time, choose native or easy to care for plants that will require little attention. Also consider using containers for some of the plants. They can be easily rearranged throughout the seasons to give a different look to the garden, and plants can be brought in over the winter months. Keep in mind essential tasks such as weeding, pruning and watering, and plan the garden to suit your abilities, time and budget so you can always keep it in perfect condition to welcome visitors.

With a little planning, you can create a welcoming entry garden to beautifully greet guests as they visit your home.

Entryway
Entryway
Entryway

Astonishing Agave

Native to the Americas, dramatic Agave is the perfect companion for the California landscape. Along with its striking leaves and architectural form, Agave is astonishingly drought-tolerant and fire-resistant, important qualities for west coast landscape plants.

About Agave

Although leaf shape and color may vary, Agave leaves always radiate from a central point in a symmetrical rosette. The leaves are succulent and, most often, pointy at the tip. Some varieties have smooth leaves while others possess leaves with teethed margins. Leaf color can range from deep green to bluish green to silvery blue to gray. Some varieties offer variegated leaves with yellow or white lines or edges. Agave is also available in a wide-ranging assortment of sizes from impressively enormous to dainty and small.

Grown primarily for its distinguished appearance, Agave does flower. The flower stalks tend to be imposing compared to the overall size of the plant and it may take years, even decades, for an Agave to bloom. Flowers may be branched, similar to a tree, or unbranched. The flowers will form seed pods or bulbils, necessary for reproducing the plants. Once an Agave flowers, the main plant will die. But the plant leaves behind clones for propagating new Agaves. You may prevent Agave from flowering by cutting off the flower stalk as it begins to form. Agave flowers are an important source of nectar for pollinators such as hummingbirds and bees.

Growing Agave

Whether grown in the ground or containers, whether grown as a specimen or grouped in drifts in the landscape, Agave requires a full sun site – direct sun – and prefers a low-humidity environment. Poor soil is not a problem and Agave can tolerate nutrient-deficient soil quite well once established. Give your Agave a good start by amending the native soil with a bit of high-quality compost. This will help increase drainage, as sharp drainage is essential. Adding gravel or chicken grit to the planting area is also helpful. Fertilize lightly. Although succulent, and therefore drought tolerant, watering of Agave is infrequent but occasionally necessary, more so for potted plants than those in the ground.

Types of Agaves

With Agave, there seems to be an unlimited selection of colors, shapes, forms, and sizes to choose from. Stop by your local independent garden center to sample their offerings.

With so very many Agaves to choose from, it is hard to select our favorite varieties, but here we go…

  • American Century Agave
    Its large size, 6 to 12 feet high, and narrow, long, wavy leaves make this an irresistible Agave for the west coast landscape. With desirable blue-green foliage, this Agave is exceptionally winter hardy to the low teens.
  • Blue Agave
    Blue Agave is where tequila comes from. As the name implies, this Agave has beautiful blue foliage, and it can grow an impressive 8 feet high by 8 feet wide.
  • Mountain Agave
    This lovely, apple-green agave with reddish-brown teeth grows up to 4 feet tall and 5 feet wide. Mountain Agave prefers full sun but will tolerate a part shade location and will grow best in soil that is well-drained, rich in organic matter, and regularly irrigated.
  • Queen Victoria Agave
    A most beloved dark-green, toothless Agave of manageable size, about 18 inches in diameter. The leaves sport attractive white markings on their sides and have a spike at their tip.
  • Fox Tail Agave
    A lovely, slow-growing Agave that will eventually grow to 4 feet high and looks like a blossoming flower with graceful, undulating, silvery-green leaves. The leaves have no teeth or terminal spine, making this Agave a dream to plant and care for. This Agave will tolerate moist or dry, well-drained soil.

Astonishing, dramatic, colorful, easy-care Agave will make a spectacular statement in your dry west coast garden, whether planted in the ground or containers scattered throughout the landscape. Have fun experimenting with new and exciting varieties.


Preserving The Magic of Fireflies

In the enchanting sky of summer nights, few sights rival the mesmerizing dance of the firefly or lightning bug to some. Those tiny exhibitionists of light, flickering in the darkness, have charmed generations with their effervescent brilliance. But a sobering truth looms: the once-abundant glow of these beloved insects is fading, their numbers dwindling as the years pass by.

What is it about these luminescent beetles that captivates us so? Perhaps it’s the whimsical vision they create, transforming ordinary backyards into magical realms aglow with twinkling lights. Or maybe it’s the nostalgia they evoke, summoning memories of childhood evenings spent chasing after tiny, elusive, flickering flashes.

Yet, despite their enduring charm, fireflies face an uncertain future. Habitat loss, pesticide use, light pollution, and climate change threaten their populations, casting a shadow over the once-abundant summertime spectacle.

Here are a few simple yet impactful ways to protect these beloved insects and safeguard their magic for generations to come:

  1. Preserve Natural Habitats: Fireflies thrive in diverse ecosystems, from meadows and forests to wetlands and grasslands. By protecting and restoring these habitats, we can provide essential breeding and foraging grounds for lightning bugs and a host of other wildlife.
  2. Minimize Pesticide Use: Pesticides not only harm fireflies directly but also deplete their food sources by eliminating insects upon which they rely. Opt for natural pest control methods whenever possible and avoid using chemical pesticides in areas where fireflies are present.
  3. Reduce Light Pollution: Artificial light disrupts the natural signaling behavior of fireflies. Excessive light can interfere with their ability to communicate, mate, and find food, ultimately impacting their survival. Closing curtains at dusk, turning off or dimming outdoor lights, using motion sensors, and opting for “bug-friendly” light bulbs and fixtures can help mitigate light pollution and create a more hospitable environment for these nocturnal insects.
  4. Create Firefly-Friendly Gardens: Planting native vegetation, providing ample ground cover, and incorporating water features can attract fireflies to your backyard oasis. Additionally, avoiding excessive mowing and chemical fertilizers and allowing autumn leaves to lie where they fall can help maintain a healthy ecosystem for these enchanting insects.
  5. Participate in citizen science organizations like Firefly Watch (https://www.massaudubon.org/programs-events/community-science/firefly-watch) and the Firefly Conservation & Research program (https://www.firefly.org), which rely on citizen scientists to collect data on firefly populations. By participating in these initiatives, you can contribute valuable information that informs conservation efforts and helps protect lightning bugs nationwide.

As we gaze upon the twinkling lights of a summer evening, may we not take for granted the glimmer of the magical firefly. With our collective actions and unwavering dedication, we can ensure that future generations will continue to marvel at their radiant display, illuminating the night with joy and wonder for years to come.

Tips for Layering Bulbs

Bulbs are some of the easiest and most dramatic flowers you can add to your landscape and containers, and you can make them even more spectacular when you create layers of bulbs for lush growth and bursts of brilliant color. But how can you go about layering bulbs for the best results?

Why Bother With Layers?

Bulbs are already easy and productive, but they can be so much more when you create bulb lasagna with multiple layers. Layering creates thicker foliage that can serve as great ground cover, and incorporating different types of flowers adds more color variety and textural diversity to the landscape. Layers ensure there are no gaps in your flowerbeds, and can fill in difficult spaces such as tight corners, small pots or narrow areas. This maximizes the use of space in your yard, and when you choose bulbs with overlapping bloom periods, you prolong the flowering season to enjoy beautiful bulbs for many weeks.

Best Bulbs for Layering

Any bulbs can be incorporated into layers, but you will have the best results when you choose bulbs with similar preferences for moisture levels, sunlight exposure and soil type. Depending on the planting depth or size of container you may be using, you can create 2-4 layers, positioning the largest, latest blooming bulbs on the bottom layer and the smaller, earlier bloomers on the top layer closest to the soil’s surface. Popular bulbs for layering include…

  • Bottom (Deepest) Layer: Larger tulips, later daffodils, various lilies
  • Mid-Season Layers: Daffodils, tulips, allium, grape hyacinths
  • Top (Earliest) Layer: Crocus, freesia, snowdrops, scilla

When choosing bulbs for your pots or landscape layering, consider the flower colors and opt for coordinating hues, bearing in mind that the earliest bloomers and latest bloomers are not likely to be seen at the same time. This is a good opportunity to create a color-changing arrangement that will offer continual thrills as the seasons change. At the same time, opt for flowers of different heights for even more textural interest.

Tips to Create Beautiful Bulb Lasagna

When you’re ready to start layering bulbs…

  • Use a deep pot, at least 10-14 inches for two layers of bulbs, and up to 18 inches deep for a triple-layered pot. If you’re planting bulbs in your landscape, be sure the hole is deep enough for all the bulbs you’ve chosen.
  • Amend the soil well with compost, bone meal or bulb booster fertilizer to ensure strong growth for each layer. Because so many bulbs will be competing for the soil’s nutrition, good fertilization is essential, but do not over-fertilize or you may burn delicate bulbs.
  • Space each individual layer slightly wider than you would typically pack bulbs to give lower layers room to grow around upper bulbs, but don’t worry – they will find spaces between each layer and grow through with ease.
  • Provide good drainage in your pot or at the bottom of the hole with sand or gravel so excess water can drain away quickly. This will minimize the risk of root rot, even though a layered pot may require extra watering to hydrate a greater number of bulbs.
  • Deadhead flowers as their blooms die off, but leave their foliage intact. The growing leaves will continue to photosynthesize, adding nourishment to the bulb so it can rebloom the next season. Once the leaves dry and die off naturally, they can be removed.

Layering bulbs can be a great way to create a colorful, long-lasting display. Fast and easy to arrange with little care needed to look its best, you won’t be sorry you experimented with bulb lasagna! Stop by Bayport Flower today!

Bulbs
Bulbs

Hellebore Black Death Disease

Hellebores are cherished for their early blooming flowers and ability to thrive in shady garden spots. However, these beautiful plants can fall victim to a serious condition known as Hellebore Black Death Disease.

Hellebore Black Death is a viral disease named for the dark streaks and spots it causes on infected plants’ leaves, stems, and flowers. These symptoms can severely affect the appearance and health of hellebores, leading to reduced vigor and, ultimately, plant death.

Symptoms

  • Dark Streaks and Spots: One of the hallmark symptoms is the appearance of black streaks or spots on the foliage, stems, and flowers. These streaks can sometimes resemble ink smudges or soot deposits.
  • Distorted Growth: Infected plants often exhibit distorted or stunted growth, with leaves becoming misshapen or curled.
  • Leaf Necrosis: Leaves may develop areas of necrosis (dead tissue), leading to a decline in overall plant health.
  • Stunted Flowering: Flowers may be fewer in number and smaller in size, sometimes displaying black streaks similar to those on the leaves.

Species Affected

Hellebore Black Death can affect a range of hellebore species, including but not limited to:

  • Lenten Rose (H. orientalis)
    Hardiness zones 4 to 9. Known for its diverse flower colors and patterns, the Lenten Rose is one of the most popular and widely grown hellebores. It blooms in late winter to early spring.
  • Christmas Rose (H. niger)
    Hardiness zones 3 to 8. This species is named for its early blooming period around Christmas in mild climates. It features white flowers that can age to a pinkish hue.
  • Stinking Hellebore (H. foetidus)
    Hardiness zones 5 to 9. Despite its common name, this hellebore is appreciated for its distinctive lime-green flowers and attractive foliage. It blooms in late winter to early spring.
  • Hybrid Hellebores (H. x hybridus)
    Hardiness zones 4 to 9. These hybrids, often derived from Helleborus orientalis and other species, are prized for their wide range of flower colors, shapes, and patterns. They typically bloom in late winter to early spring.

Prevention Strategies

Preventing Hellebore Black Death requires diligent garden hygiene and cultural practices. Here are some effective strategies:

  1. Purchase Disease-Free Plants. Always buy hellebores from a reputable garden center, such as Bayport Flower, that is conscientious about offering disease-free plants.
  2. Before planting, carefully inspect new plants, especially those received from a questionable source, for any signs of disease and continue to monitor the plants for symptoms.
  3. Remain diligent in regularly disinfecting gardening tools to prevent the virus’s spread. A solution of 10% bleach or 70% alcohol can be used for this purpose.
  4. Most importantly, maintain plant health. Healthy plants are less susceptible to disease. Ensure your hellebores are well-watered, mulched, and fertilized appropriately.

Hellebore Care

Keeping hellebores healthy by providing proper care will go a long way in preventing Black Death.

General Care Tips

  • Light
    Hellebores prefer partial to full shade but can tolerate some sun, especially in cooler climates.
  • Soil
    Hellebores thrive in well-drained, humus-rich soil with a neutral to slightly alkaline pH.
  • Water
    Although they are considered drought tolerant once established, consistent moisture is beneficial, especially during their growing season; however, waterlogged conditions should be avoided.
  • Mulch
    Applying mulch can help retain soil moisture and provide nutrients as it decomposes.
  • Feed
    Fertilize hellebore with a balanced fertilizer listed for perennial plants every spring as new growth appears; also, at this time, apply a fresh layer of compost atop the soil around the base of the plant.

By selecting hellebore species suited to your USDA hardiness zone and providing proper care, these useful, beautiful, and resilient plants can grace your shade garden for many years.

Aphids, The Main Culprits

Even with perfect care, hellebores can still succumb to Black Death, and aphids are the main culprits in transmitting this disease. These tiny insects can be found on the undersides of leaves, stems, and flower buds. They reproduce rapidly, making it easy for them to quickly infest a plant and spread the virus.

To protect your hellebores from Black Death Disease, managing and controlling aphid populations is crucial. Frequently inspect hellebores for signs of aphid infestation. If there is aphid pressure affecting your hellebore, here are some strategies to regain control:

Biological Control

  • Natural Predators
    Encourage natural predators such as ladybugs (ladybird beetles), lacewings, and parasitic wasps, which feed on aphids.
  • Companion Planting
    There are many companion plants that repel aphids. Unfortunately, hellebores are shade-loving plants, and most companion plants listed for aphids require full sun. Planting aphid-repelling plants like chives, dill, cilantro, and mint near hellebores can help deter aphids yet grow slower and smaller in the shade.

Chemical Control

  • Insecticidal Soaps
    When used properly, these are effective against aphids and have minimal impact on beneficial insects.
  • Horticultural Oils
    These oils can suffocate aphids and should be applied according to label instructions to avoid harming the plants.
  • Systemic Insecticides
    Systemic insecticides can be used for severe infestations. These chemicals are absorbed by the plant and target aphids as they feed. Use these with caution and follow label recommendations to minimize environmental impact.

Integrated Pest Management (IPM)

Adopting an integrated pest management approach can provide a comprehensive strategy for controlling aphids and reducing the spread of Hellebore Black Death. This approach combines cultural, biological, and chemical methods to manage pests effectively and sustainably.

  1. Monitoring
    Regularly monitor hellebores for aphid activity and signs of viral infection.
  2. Identification
    Correctly identify aphid species to determine the most effective control measures.
  3. Thresholds
    Establish action thresholds to decide when control measures are necessary.
  4. Control
    Implement a combination of control methods, starting with the least invasive options.

Currently, there is no cure for Hellebore Black Death once a plant is infected. The virus can persist in the plant and soil, making eradication challenging. Therefore, the focus should be on prevention and early removal of infected plants. Infected plants should be dug up carefully to avoid spreading the virus through the soil. Dispose of these plants by burning or placing them in sealed bags for disposal rather than composting. In areas where infected plants have been removed, soil solarization can help reduce viral particles in the soil. This involves covering the soil with clear plastic sheeting for 4-6 weeks during the hottest part of the year to heat the soil and kill pathogens.

By effectively managing aphid populations, providing the correct cultural conditions, and practicing good garden hygiene, you can significantly reduce the risk of Hellebore Black Death and keep your hellebores healthy and thriving.

Hellebore Black Death is a serious and damaging disease with no current cure. However, its impact can be minimized with vigilant garden management and preventive practices. By ensuring the purchase of disease-free plants, providing the correct cultural conditions, practicing good sanitation, keeping aphid populations under control, and promptly removing infected plants to avoid the spread, gardeners can help protect their hellebores from this devastating disorder.

Hellebore - Black Death Disease

Raising the Next Generation of Gardeners

Gardening is a valuable skill and teaching young children to garden imparts to them much more than just how to grow plants. Raising the next generation of gardeners is incredibly rewarding and adapting gardening practices to engage kids will get children of all ages enthusiastic about soil, seeds, and harvests.

What Gardening Teaches Kids

Gardening is a valuable skill for children to learn, and it involves much more than just the everyday language of gardening, how to use garden tools, or learning about produce. Gardening can teach children…

  • The value of commitment and following through on a long-term task to complete a goal
  • Patience while waiting for plants to mature and produce
  • Hand-eye coordination and refined motor skills to manipulate tools and seeds
  • Planning and organization to create a garden and master the tasks for it to flourish
  • The science of water cycles, ecosystems, weather, climate change, ecology, insects, and more
  • Cooperation and how to work with others to manage and tend a larger garden
  • Healthier eating habits and a better knowledge of how food gets to the table
  • Confidence and a sense of accomplishment with a well-grown, productive garden

With so many skills connected to gardening, teaching children to garden can enhance many areas of their well-being and give them skills that can be used throughout their lives.

How to Engage Kids in Gardening

The key to encouraging children to garden from an early age is to adapt gardening to their skills and interests. Fortunately, there are many ways to plant the seeds of gardening interest in young minds.

  • Start at the Beginning
    Children should be involved in all aspects of gardening from the very start of the process. Allowing children to help choose where a garden should be located and which plants ought to be grown will help them feel invested in the project, and that ownership will help them be more willing to see it through. Let children browse seed catalogs to choose what interests them or bring them to the garden center to shop for seeds, seedlings, new tools, and garden accessories they can be excited about.
  • Keep It Small
    A large, complex garden can be overwhelming to a young gardener. A smaller plot, however, such as a single row, a dedicated flowerbed, a raised bed, or even just one container can become their very own garden and personal gardening space. This will let them tackle gardening tasks on a more comfortable scale that they can manage. A smaller space will also be more practical for young gardeners to ensure they don’t lose interest with repetitive tasks.
  • Choose Kid-Friendly Plants
    Allowing youngsters to choose their own plants is a great way to encourage their gardening interest and kid-friendly plants such as watermelons, pumpkins, carrots, and sunflowers are all fantastic choices. Let young gardeners select flowers in their favorite colors or foods they are already familiar with to engage their interest and keep them looking forward to each new development in the garden.
  • Incorporate All Senses
    A child will expect that a garden will eventually be tasty, but incorporating all their senses throughout the garden will excite them even more. Choose fragrant herbs and flowers to complement different parts of the garden, foliage that may make unusual sounds in a breeze, and plants with different touchable textures, shapes, and colors to add variety to the space. While it is important to avoid plants that could be dangerously toxic or might have sharp thorns, a varied garden will be one children will find more interesting.
  • Provide Proper Tools
    Most garden tools aren’t sized for tiny hands and may be awkward for younger gardeners to hold and manage. Instead, opt for specially sized tools designed for kids, which will have smaller handles and easier grips. Tools in fun colors or bright patterns can also keep kids excited about gardening, and having their own bucket or basket of tools will ensure young gardeners are fully vested in all the activities of gardening. And don’t forget child-sized gardening gloves and an appropriate garden hat for sun protection as well!
  • Add Fun in the Garden
    Make the garden a fun place for kids to be by adding extra touches such as a quirky garden gnome, themed garden flags, or energetic pinwheels. These simple decorations can help kids make the space their own and bring extra color and activity to the garden. Making personalized plant tags, steppingstones, row markers, or other garden accessories can be fun craft projects that help kids feel empowered in the garden space and will teach them about additional garden tasks and why they are important.
  • Share With Friends
    Turn gardening into a play date by inviting friends to help with outdoor tasks, such as weeding, planting, watering, mulching, and more. Turning the task into fun will not only encourage children to complete garden chores but may also inspire more children to take up gardening. Other ways to share gardening with the next generation include introducing a children’s garden or gardening group to a local church, school, or community center.
  • Go Beyond the Garden
    Reinforce gardening lessons by moving beyond the garden. Involve children with cooking the produce they raise, including making jams, jellies, salsas, pickles, and preserves, and remind children that they contributed to these delicious treats whenever you enjoy them. Teach children how to compost spoiled produce and wilted plants, and consider entering their best produce in a county or state fair to recognize their efforts.

The more methods you use to get kids involved in gardening, the more interest they will have and soon they will build life-long gardening habits.

Next Gen Gardeners
Next Gen Gardeners
Next Gen Gardeners
Next Gen Gardeners

Raising Tomato in Raised Bed

There’s nothing quite like a homegrown tomato! Store-bought just can’t compare to the exceptional freshness, quality, variety, and, most importantly, taste of a tomato you grow yourself. Raised bed tomato growing makes the whole process, from soil to table, convenient and easy for the home gardener.

Why Raised Beds

Raised bed gardening offers several advantages over growing in the ground; these include:

  • Improved soil conditions
  • Earlier planting
  • Easier maintenance
  • Decreased garden pests
  • Higher crop yield

Preparing Raised Beds

Growing vegetables in a raised bed are essentially the same as growing vegetables in any container, and did you know that high-quality soil packed with compost and rich in nutrients is your best choice for a raised bed garden?

Bayport Flower can recommend the perfect power-packed soil and compost that feeds the soil, which will, in turn, feed your tomatoes!

Don’t forget the fertilizer! At planting time and regularly, apply an organic fertilizer recommended for vegetables. This will ensure your tomatoes get everything they need to grow and fruit to their full potential.

You can grow the best vegetables ever this year! With the help of Bayport Flower, you are guaranteed the best seeds, vegetable starter plants, soil, compost, and plant food available anywhere, making it possible for even the newest gardener to obtain outstanding results.

Tomatoes for Raised Beds

When selecting tomatoes for a raised bed garden, we recommend looking for bush and tumbling varieties. These designations should be listed on your plant tags, or we are happy to help you with your tomato selection beyond the list provided in this article.

Bush tomatoes are compact-growing, non-vining tomatoes that economize on the limited space that a raised bed garden offers. Bush tomatoes also require less care than their tall vining partners as there is no need to prune them, and they are easily supported with a standard tomato cage. Bush-style tomatoes are perfect for slicing to use on sandwiches.

  • Better Bush
    A medium-sized tomato with a great flavor, borne on a vigorous, bushy plant.
  • Celebrity
    A flavorful, medium to large-sized fruit, perfect for slicing on a 3 to 4 feet high plant.
  • Patio
    A small but very productive, compact plant, about 2 feet high, with smaller, yet tasty, fruit to match.
  • Roma
    A well-known and highly prized sauce tomato, Roma is a pear-shaped Italian-style tomato. Roma is less juicy than other tomatoes making it perfect for freezing too!
  • Rutgers
    Rutgers is a very productive heirloom tomato known for its large, red, super-tasty fruit.

Tumbling tomatoes, also called cascading tomatoes, are vining varieties, usually cherry or grape style, and make the perfect addition to a raised bed tomato garden. Plant this type of tomato along the edge of the bed, allowing it to tumble or cascade over the side for easy access to the fruit. No need to stake!

  • Juliet Roma Grape
    A very sweet, grape-shaped variety, great for summer kabobs.
  • Black Cherry
    Round, dark, and flavorful, perfect for snacking right off the vine.
  • Sun Sugar Yellow
    Super sweet, orange-colored tomato on a heavily producing plant, Sun Sugar Yellow tomatoes will sweeten your summer salads.
  • Super Sweet 100
    This tomato’s claim to fame is its high sugar content, which creates its unsurpassable sweetness.
  • Tumbling Tom Yellow
    Perfect for containers, hanging baskets, and raised bed gardens, small, yellow, delicious fruits are abundant on this tiny tumbler.

Planting in Raised Beds

Tomatoes, even bush type, should be planted deep by burying about two-thirds of the plant’s stem with the first leaves just above ground level, meaning all leaves below the soil level should be removed at planting time. If tomato plants become leggy before being set in the ground, they may be planted horizontally as roots will continue to develop on the buried stem.

Ongoing Care in Raised Beds

Water and fertilize at planting time and adhere to a regular schedule for both. A well-adhered-to-watering schedule or routine will ensure a good fruit set, a high yield, and avoid blossom end rot disease.

In addition to fertilizing at planting time, established tomato plants should be fed every 4-6 weeks through the growing season. Nutrients can be leached from the soil due to excessive rainfall and regular watering. Fertilizing with the correct product will feed your plants all the macro & micro-nutrients they need, including calcium, to prevent a common tomato problem called blossom end rot.

Growing in a raised bed makes getting quality tomatoes to your table a whole lot easier, giving you more time in the summer to enjoy a good tomato sandwich, and Bayport Flower is here to provide all the information and products necessary to make your summer tomato dreams come true.

Tomatoes
Tomatoes
Tomatoes